❁ PhotoShop Name Animation Tutorial ❁
This tutorial is going to show you how to make a photoshop name animation, like the one below.

This animation will help us learn to make frame-by-frame animations in photoshop.
Step 1.
First, you need to make a new photoshop file. Make it 600w x 300h or something similar.

You will make a text layer of your name in a large font. The font should also look like handwriting - it will make the animation look better. After making the font layer, 'duplicate' it in a new layer and make the original text layer not shown.

You will end up with a file that looks like this.
Step 2.
Now, duplicate the copy of the original text layer (you will need to make a lot of copies in this project). Once you've made the copy, erase a little bit of the last letter off.

Like this.
Continue to make copies and delete a little bit off of each letter until your file is blank. Remember to make the previous layer not visible each time you make a new layer.


Pretty soon you will have a blank rectangle.
Step 3.
Now that you have made all of your layers, you will make a 'frame animation.'

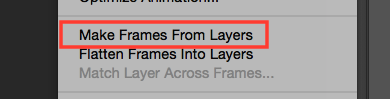


The circled one is the one you want to use.
You will then click 'make frames from layers.'


Once you do that, at the bottom of your photoshop screen you will see a timeline like the one in the image above.

Finally, for the last step, you will reverse the frames. Once you do, the animation will give the effect that it is being drawn by someone.
Once you're done, you can also add cool effects to your animation. I, for example, made my text change color at the end.
Nice job!
ReplyDelete